Your Nav Bar Here

Showing posts with label hair. Show all posts

Wednesday, January 9, 2013

Do the Donut

Photo by: Rory M.
Hello Beauty Bloggers! Today, I want to share one of my favorite recent beauty tricks! In 2012, the sock bun took us by storm. It is fun, easy to do, easy to accessorize, and looks fabulous! However, I found a device that makes it even easier! Enter the donut.

The donut is made of a meshy, spongy material, and comes in multiple sizes and colors. What I like about it is the hair tends to hold better to the material, and it allows bobby pins to be inserted directly into the device, making for better security. If that isn't enough, it also comes in my hair color, which makes it harder to spot.

Here's how it works!

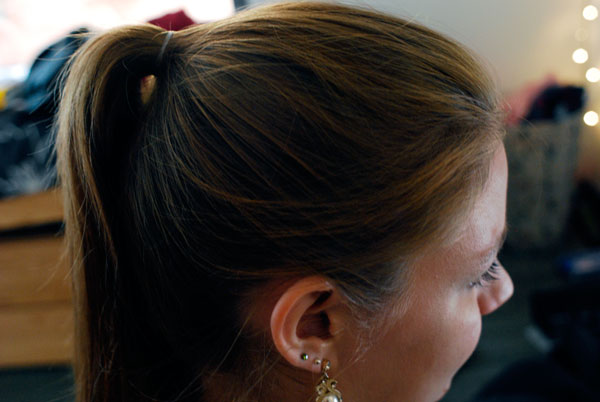
Step 1: Tie hair off in a pony tail at the point where you want your bun.

Photo by: Rory M.

Step 2: Pull the pony through the center of the donut.

Photo by: Rory M. 

Photo by: Rory M. 
Step 3: Slide the donut up the pony until it gets to the ends. Don't go so far that the pieces begin to fall out. If that happens, slide it back down and repeat Step 3.

Step 4: Tuck the ends under the donut. I even tuck them back up in to the center of the donut for maximum hold.

Step 5: Start turning the donut inside out, rolling it down the ponytail until you get to the base. The number of turns depend on the length of your hair. The longer the hair, the more turns.

The bun will probably be a little loose when you get to the bottom. I pin the loose hairs under the bun (or into it) to make it tighter.

Photo by: Rory M. 
Experiment with some accessories (flowers, bows, etc.) to make it your own! There are a bazilion (yes, that many) ways to get creative with a fun bun!

Photo by: Rory M. 

Be sure to share some of your ideas with us at: anewbeautyblog@gmail.com!

Monday, December 24, 2012

Rory's Secret Twist

Photo by: Rory M.


The French Twist is an old style, but the technique I am sharing is one that I discovered by accident, and it remains the only way I do twists now. 


Photo by: Rory M.
Step 1: Brush out the hair nice and smooth!


Step 2: Gather the hair at the base of the neck into a pony tail. 


Step 3: Position your hand over the ponytail, holding it between your thumb and index finger. 


Now it gets fun...


Photo by: Rory M.
Step 4: Rotate your finger counter-clockwise from 6 to 12 o'clock. The hair should be wrapped once 
around your finger.


Step 5: From there, rotate your hair down to 3 o'clock. 


Step 6: Turn your index finger to the left, so it points directly at your head. Keep turning until your finger is at nine o'clock (as seen in figure 5). 


Photo by: Rory M.
Step 7: Pull, tug, and tuck until the twist looks as you want it to. Bobby pin all the excess hair in place. Bekka's hair is very long, but we only used 7 bobby pins to keep it all in place!


Once your twist is all in place, give it a veil of hairspray to keep it smooth and together. 


Photo by: Rory M.
Don't be afraid try accessorizing like we did with a little red rose. The French Twist is a great style if you want simple elegance, or if you want to experiment with flowers, bows, clips, headbands, etc. 
Photo by: Rory M. 
Photo by: Rory M. 

Happy Holiday Hairdressing!
EOB

Tuesday, December 11, 2012

Five-piece Braid


Photo by: Rory M. 
Photo by: Mike B. 
Today's tutorial isn't an easy one. The five-piece braid is complicated, not because of the process, but because of the nature of the braid. No matter how dexterous your hands may be, most of us have only two at the most, and juggling five strands takes a lot of concentration and coordination. 

I began the braid by taking a small chunk of hair from the heavier side of a side-part. Next, I separated the hair into five even pieces.

Photo by: Mike B.
The five-piece braid is essentially made up of weaving the five pieces in-and-out of each other. I begin with the right piece and pull it over the piece directly to its left. 

Next, I pull it under the next one to the left. Then, I go over the next piece. 

Instead of going under the following piece (on the far right), I took the strand on the far right and pulled it over the new strand now directly to it's right.
Photo by: Mike B. 

I know that's a lot of overs and unders. The way that I remember it is this: 

  • Begin on on end.
  • Over
  • Under
  • Over
  • Repeat from other end. 

One of our readers sent us a great website that shows very clearly how to make four, five, six, even seven-piece braids! I like this site because it shows how to make the braids in a very clear way.
Photo by: Mike B. 
Photo by: Mike B. 
E-mail us your hair challenges at: anewbeautyblog.gmail.com

Tuesday, November 13, 2012

Something I Saw on the Tube

Photo by: Rory M.

Last night, I saw this hairstyle on a contestant on "The Voice", and desperately wanted to try it out! Lucky for me, I was enjoying a wonderful evening with some girlfriends who let me experiment with their hair. Here's what we got!

Step 1: Take a small section of hair from one side of the head.

Photo by: Rory M.
Step 2: Begin braiding small section around the head until you start getting to the back.

Photo by: Rory M.

Step 3: Once you get to the back, start adding strands to the upper side of the braid. This looks like a French braid with hair only being added to one side.

Photo by: Rory M.

Step 4: Continue half-French braiding, angling the braid downwards. It should begin to look diagonal. Follow this step until you reach the opposite side from which you began.

Photo by: Rory M.

Step 5. Finish the braid, and tie it off.

Photo by: Rory M. 

Give it a try!

Rory

Monday, October 22, 2012

Straightening Curly Hair

Photo by: Rory M.
Photo by: Rory M.
Photo by: Rory M.
If you've been following us for a while, you should know by now that my sister Tessa has the most wonderful curly hair. Unlike many curly-heads I've talked to, Tessa love-love-loves(!) her curls. Despite her love for her natural locks, sometimes she craves a sleeker look when leaving it down, or even when putting it up. For that, we enlist the help of our good friend: Mr. Hair-straightener.

Photo by: Rory M.
Now before you throw rotten fruit at me saying, "But Rory! Heat kills hair!", let me clarify that everyday straightening will, over time, hurt your hair, and I would never suggest you do that. However, once-in-a-while straightening will not kill your hair.

Now that we've got that straightened out (Haha, get it?), let's get to it!

Step 1: Begin with dry curls and brush them out. I know this part isn't fun, but good luck trying to straighten curls without this step. Seriously, brush those babies.

Photo by: Rory M.
Step 2: Separate your locks. Trying to straighten a large chunk of hair often doesn't work, and you end up running two hot plates over the same area, exposing it to heat damage. So we put half of Tessa's hair up, and began working with smaller sections.

Step 3: Start straightening! The pieces we did were about 1/8 inch thick and 2 inches wide. We intentionally left the ends curled (She eventually braided it, and the curly ends looked so cute!).

Try not to hold the straightener on a particular spot for too long. It could result in burning the hair. Just clamp it shut, and run it down to the ends.
Photo by: Rory M.

Step 4: Once you've succeeded in straightening the entire head, use some product to smooth and hydrate the 'do. We used John Freida Frizz-Ease Extra-Strength Serum.
Photo by: Rory M.


Remember:

Your hair wants to revert back to its natural state, so keep it away from water and humidity, if possible.

Your ends are the most delicate parts of your hair. be gentle on them when straightening because it is easier for them to get split or damaged by excessive heat.

Feel free to use a heat protective serum or lotion to protect your hair against damage. I usually use Got2be Crazysleek Flat Iron and Blow Dry Lotion

Like every part of our bodies, the health and safety of your hair should come before style! Be sure to consult a hair stylist or a friend if you're concerned about how heat straightening may be affecting your hair over the long run. My sister and I have been doing this for years, but we're always very careful. So take care of your hair, and have fun switching up your style!

Photo by: Rory M.

Tuesday, October 9, 2012

Scrunch Me

Photo by: Rory M.

Photo by: Rory M.
Hey Beauty Bloggers! We have a quickie hair tutorial for you today! What I love about this scrunchy braid is that it goes with any length hair! 

This summer, my friend Sam cut her hair herself, and I think the bob suits her face and personality perfectly! 

To begin, we section off a small bit of hair from the topmost layer and make a loose braid from the roots to a half-to-an-inch (depending on your ends) from the tips. 

Photo by: Rory M.
Now comes the tricky part. At the end of the braid, separate the two outermost pieces from the center piece. With one hand, hold the center piece in place, and with the other, slide the two outermost pieces up the braid. This will give it the "scrunched" look. 

Then, just slide and assemble the now-scrunched outer pieces until they achieve your desired look. 

When it looks the way you want, tie it off with an elastic, and you're ready to rock it! 
Photo by: Rory M.
Questions? Comments? Requests? Send them our way at anewbeautyblog@gmail.com!

Tuesday, August 21, 2012

Accessorize

Photo by: Rory M.
If you live in New England, then you know that the weather can be unpredictable. However, one thing that has been predictable almost all summer is the humidity. Nothing gives me (or anyone else I know) hair-stress like the big, bad H-word. Humidity makes hair uncooperative at best. 

Instead of stressing out over a style that will last and look all right throughout the day, I have found that the simplest way to combat humid-hair is to accessorize! If you're like me, and get bored of hair easily, accessorizing allows me to be lazy, but still feel like I'm being fresh and new-ish. Clips, bows, flowers, beads, bands, ties, wraps, hats- all's fair in love and humidity. Give it a try, and have some fun with it. 

Happy accessorizing!

Rory 

Monday, August 13, 2012

You Didn't Have to Cut Me Off

Photo by: Rory M.

We've all done it. Amen? Amen. 

Yes, I'm talking about the dreaded "bad haircut". If you've read my previous post, you'll know about just one of my incidents. I wish I could say that I've learned my lesson, and it's been smooth sailing ever since, but that would be a big, fat lie. In fact, just last week I got a cut that I was less-than-satisfied with. This experience has prompted me to write a list of steps that I've taken to make the best of a bad haircut. 

1. Be vocal. 

If you don't like it, say so. You won't hurt anyone's feelings. It's far better to be picky and come away content, than to leave unsatisfied and hate your 'do until your next visit. 

2. Reality check.

If there's nothing to be done, then it's time to face the music. That is accept that you're not happy with it, but also give yourself a reality check: it's only hair, and that's not all there is to you. It sounds silly, but it helps to remind yourself that you are beautiful and valuable no matter what your hair looks like.

3. Find a kindred spirit. 

Chances are, you are not alone in your hairstyle. When I didn't like my hair, I started researching celebrities who had a similar style. It inspired me to look at mine a different way. This was actually very helpful. Once I saw the style on someone else, I thought it was super cute, and I was ready to rock it!  

4. Get a second opinion. 

No matter how bad it is, it's helpful to get the opinion to someone who is not under the emotional duress that often follows a bad haircut. Even if it's unanimously bad, someone else might have a positive way to look at it. For instance, last week my mother told me all the things she liked about my new style, and that was encouraging. She saw what I didn't. 

5. Find your style. 

There is often another way to style bad hair that is more to your liking. For instance- Don't like short bangs? Try a headband, or braid them. If nothing can be done, well, wigs are more common than you may think. 

Happy styling!

Rory 

Thursday, August 9, 2012

A Hair Story: The Devil Made Me Do It

Photo by: Alex L. (This is me shortly after my haircut!)                       
As I've alluded to in previous posts, beginning the life of a college freshman isn't easy. Unfortunately, we tend to take out the stress of this process on those we love, and although I believe my hair has forgiven my past transgressions, this was a rocky time in our relationship. 

Before I begin, there are two things you must understand: 

1. I love my hair. It's also been a lifelong dream of mine to have long, long hair.

2. My college career began during one of the hottest weeks of the summer. It was uncharacteristically hot and humid, and much of our orientation activities were outdoors. 

If you are cringing now, then I know you are catching my drift- outdoors, humidity, stress, hair, oh my. 

At this time, my hair had finally grown into a long length that I was content with. Braids, buns, twists, and tucks roamed freely and all was well in the hairosphere. That is, until orientation week. 

As I've written in at least one previous post, orientation week was not my cup of tea. It insisted that I leave the comfort of my newly decorated dorm, talk to strangers, and participate in get-to-know-you activities. The nerve of these establishments. 

Long story short, all the mandatory events that made up our busy schedule meant that I didn't have much time to spend on my hair, and as a result, I didn't like how it looked. So what do you do? Find the nearest hair salon and do something crazy. 

I walked into the establishment with a sign overhead reading "Hair Adventure". Looking back, it seemed very appropriate. After a once-in-a-lifetime head massage (Seriously, it was that good.) and a good long talk with the masseuse about cake and how to best attract the attention of the boy she was crushing on, I was in the hot seat. The conversation with the hairdresser went something like this:

"Okay, what do you want?"
"I want a bob."
"A bob?"
"Yes, a bob. Cut it all off."
"Okay, so you want it like this?" She traced a line with her fingers, angling them from just below the chin, up the jaw line, to rest at the base of the skull parallel to her ear lobes. 
"No, a bob. I want it to be even length all the way around." I too traced a line from mid-neck to chin.
"Sweetie, I know bob. That's not bob." 
"No, you're describing an inverted bob. I want an even one that ends at my chin." We went back and forth on the definition of a bob for a time before I finally said, "Fine. No bob. Just cut it evenly at my chin." That seemed to pacify my equally strong-willed hairdresser, and she went to work. 

To me, hairdressers are like surgeons. Together you discuss the desired outcome of the procedure, and then they tell you what the procedure will consist of . For these sensitive professions, a certain amount of bedside manner is expected in order for the patient to be calm, trusting, and cooperative. This key ingredient was lacking in my story. 

I began to get teary as I watched her gather up my long hair into a loose ponytail. She noticed and asked if I was nervous. I nodded, noting in the mirror just how pathetic I looked. She smiled wickedly, flipped the ponytail over my head so it dangled in front of my face. Then, at eye-level, the scissors came into view, cutting off my treasured locks as she sang, "Ooooh, bye-bye haaair!" I spent the rest of the cut gathering up the remains of my former life in my lap and braiding it as if it were still securely attached to my head.

I'll spare you the remaining details. I've spent much of the time between now and then regretting the decision to chop my hair off, and concentrated on 1) growing it back and 2) figuring out what had caused me to (in the span of 48 hours) abandon my dream of long hair and sabotage my efforts. 

The conclusion I have come to is this: control. I felt alone, undesirable, and completely out of control. So if my silly story can mean something to you, it would be this: Control is not always a guarantee, but choice is. You may not be in control of a situation, but you choose how you respond to it. You can choose how to react to a new environment. You can choose positive thinking habits. And you don't need to take it out on your hair. The choice is yours.

Rory

Sunday, August 5, 2012

Challenge Accepted (Twisted Updo)

Challenge:                              Challenge Accepted:


Step 1: Brush out hair and tie into a half-pony. 
Photo by: Rory M.
Step 2: Using 2 fingers, make a space right above the elastic. Gather up pony, tuck into opening, and pull it down. For more information on this step, look here. This style is called the inverted ponytail.
Photo by: Rory M.
Step 3: Split ponytail into 2 pieces. Set one aside and begin twisting the other.
Photo by: Rory M.
Step 4: Twist until the section begins to coil over itself. When it is coiled, pin it down. You can always twist and turn the coil until you like its placement. Don't forget to pin it! 
Photo by: Rory M.
Photo by: Rory M.
Step 5: Repeat Step 4 on the other side of the pony. 
Photo by: Rory M.
Step 6: After both sides of the half-inverted-ponytail are fully twisted, coiled, and pinned, we parted the rest of the hair and followed the same steps for the rest of the head, until all of the hair is twisted, coiled, and pinned to your heart's contentment!
Photo by: Rory M.

This process worked well for us because the half-inverted-ponytail served as a basis for the rest of the hair. We were able to do the center first and use it as a reference point for the entire style.
Photo by: Rory M.
We didn't really go to great lengths to hide the bobby pins. Unless you like the "heavy hardware" look, be sure to tuck them safely underneath the curls!
Photo by: Rory M.
Thanks Chelsea! Chelsea was such a wonderful model for us. Her carefree attitude and perpetual smile make her a joy to work with!

Send questions and Hair Challenges to anewbeautyblog@gmail.com.

Rory & Alysha Marie